Thursday, August 30, 2012

Tru-Bolt Alarmed Padlock

So while I was out picking up some material for a project I happened to run across this padlock.

I thought to myself, well, it has an unusual key, it has a tamper alarm, it's about $12... I need to play with this right now.

After reading the write up it has on it's packaging I was very excited to begin attempting to defeat this lock.

Here's what Tru-Bolt has to say about it's product:

This is the keyway and key, not much room to get a pick in there.:


I thought that perhaps I had found a decent lock with a novel idea at a decent price.

This is what happened when I opened it the second time:

I turned the key and then the whole lock plug came out.

This here is the only thing that holds the lock in place:


The ENTIRE security of this lock is defeated by this poor design
It's not tapped and threaded to lock it in place, it's not even glued in place, nothing, just rammed in there. Here's the corresponding  spot on the lock where it gets inserted:
That's not a particularly deep drilling point, it doesn't mushroom out at the top, it's actually tappered to a point at the lowest spot. There's NOTHING to actually keep that pin in it's place. Since that's the ONLY thing holding the lock plug in place that causes a bit of a problem.

I was pretty disappointed at that moment, this intriguing challenge ruined because some knucklehead didn't think about securing that pin.

Spirit bent but not broken I carried on with the dissection of the lock.

There is still the actual lock and the alarm.

Since the lock itself is essentially useless I put that on a back burner for later and went about finding out how this tamper resistant portion worked.

Let me start by saying that 110db (if that's actually how loud it is) is pretty damn loud. Ear splitting "OMG the earth is ending" loud. Needless to say the novelty of it going off did not extend to my family while I was playing with it. It was suggested that I make it stop doing that if I were to continue to occupy the house.

Here's the internals of the alarm.

It's really really loud.
Seriously.

Here's the bottom housing of the lock. It only holds the speaker, the contacts there connect to the battery pack and electronics that are housed in the lock body. It's attached by 2 screws that are accessible when you remove the shackle.
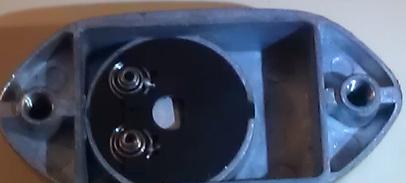

Inside

Outside, also the bottom of the lock.

Here's the actual electronics:

This is the battery pack, housing for the circuit board, and contacts that connect to the speaker. It's held in place by a large O ring that is pressed into a groove around the battery pack device and the lock body. This also helps weather proof it.
Battery Pack

Other side of the battery pack

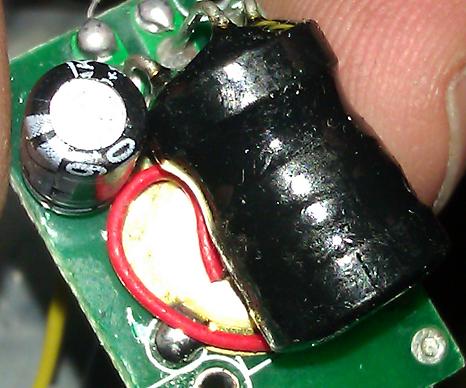
Bottom of the circuit board on top of the battery pack

Another angle
Here is the ball for the switch that either enables or disables the alarm, it's a simple contact switch housed in a rubber / silicone housing inside the lock, above the battery pack.


As you can see here the shackle has a recessed area on one side. If you insert it with the recessed area in the hole with the switch the alarm is not active. The contact is not pressed, the circuit is open. If you insert the side that does not have the recess cut the ball is pressed into the contact and the circuit is closed and the alarm is then active.


Here's the lock and the part the interacts with the shackle to prevent it's unintended removal from the lock:


Insert the key and turn and the little wing there moves out of the path of the groove on the outside of the shackle.

On the product package it touts that the alarm has an "Anti-muffle design: alarm sound can not be concealed"

That, friends, is a lie.

BEHOLD!!! My magic sound dampening putty

It's actually just magnetic silly putty, but it works really really good.


                                                       Apply it to the lock as shown:


Once this is in place that lions roar of an ear shattering sound is reduced to a kittens squeak. It's completely tolerable. More along the lines of a kids toy buried under some stuffed animals than a rampaging 110 db alarm.

Part of the reason this works so well is that they've weatherproofed the lock so well to keep the internals dry. The only place loud sound can get out is at the vents on the bottom. VERY minimal sound can escape through the rest of the lock. Had they done a poor-er job of making it water tight you wouldn't be able to muffle it as well and that 110 db would be leaking out of everywhere.
They did one thing right, and it makes the lock worse.

I would feel comfortable picking this lock on a shed in someone's back yard while they slept in their house with the putty over the lock, there's no way they would hear it.

I haven't tried it yet, but I bet submerging the vents in water would also muffle the sound greatly. I also have an idea about using a paper clip to press against the speaker or puncturing the speaker, thus rendering the alarm function null and void. I'll do that later, after I'm done with the other experiments.

Alright so we now know we can muffle the sound. But what exactly does it take to set off the alarm, how sensitive is it? Well if I knew more about circuitry I could probably tell you. If anyone can give me some insight on the components on the circuit board that would be awesome, just leave something in the comments.

As it stands all I can do it just hit and shake the thing to see if it would go off. Given the lack of support I was receiving that night in my journey towards knowledge (did I mention that alarm is REALLY loud??) (Really really loud) (DAMN that thing is loud) I had to rig up a visual method to find out if the alarm was being tripped.

I got an old LED, a 9V battery connector, and some electrical tape and rigged myself up a visual alarm that would light the LED when the alarm is triggered.

Here's the video of me smacking it with a screw driver. Not very elegant, but I couldn't set the thing off by just shaking it in my hand, I had to hit it with something:


You actually have to smack it pretty hard, several times, to get it to go off, and it's kind enough to give you a 3 beep warning before it actually goes off. When it does go off it triggers the alarm for 10 seconds, then it automatically resets itself, I assume to save batteries.

So there you have it.

I have yet to get intimate with the lock itself but I hope that at least one part of this padlock is worth it's salt. As it stands I wouldn't use this thing to guard anything I considered valuable. I'm fairly certain if you stuck any key in the lock, or a sturdy tension tool, and turned it the pin holding the lock in place would give out and the whole thing would just fall apart.

I'll update this when I've laid bare the secrets of the lock itself.

Tuesday, August 21, 2012

Master Lock #3 Padlock teardown and the Peterson Silver Bullet Bypass

I don't own many bypass tools. To be exact I own two, one of my own making and the Peterson Silver Bullet for Master Lock Padlocks.
I picked up the Silver Bullet at Defcon from the Merch area, it looked deceptively simple from the example lock and demonstration. I just so happened to have a #3 padlock I had brought with me so I bought it.

I spent the next several days trying to figure out how in the hell to use the damned things. I read the directions a few hundred times, I looked online and all I saw was a lot of videos showing how easy it was and descriptions of "you just slide this one in, press down, then slide the other one in and press down".

I could not get it to work.

Furthermore there was nothing online that showed exactly how it worked, what it moved, and what the lock looks like inside.

So I decided to tear my lock apart and take a look for myself and see exactly what the hell I was supposed to be doing in there.
It's a #3 it got a bit ground off
So these here are the bypass tools, one marked A (shorter) and one marked B (longer). I've added a bit of heat shrink as a make shift grip because these are very thin and are hard to hold onto if your fingers are sweaty, also after a few hours of trying to get these to open the lock my fingers were getting sore from the edges of the metal.
Peterson Silver Bullet Bypass w/ "custom" grips


Here's the lock with the face and the unimportant plates removed.


This is what the "unimportant" plates look like. The inside shape is identical on all of them. The ones near the bottom (where you insert the key) of the lock are smaller on the outside to accommodate the blue plastic "Master" wrap the locks have on them.

This is the lock cylinder. Nothing fancy, just a 4 pin setup with no security pins. The back has a protrusion that when the sheer point is reached and the plug turned interacts with a post that moves the locking plates and releases the shackle.


This is the padlock without the plug. Finally I was able to see what was going on in there.
Outlined in Yellow are the locking plates, Red is the post that rotates to move the plates and release the shackle
                                     Here's a larger picture of the internals of the padlock.

                                               This is what the locking plates look like

You can see the scratches where I've been using the bypass on this one.

                                               So this is how the bypass actually works
This is with the A bypass inserted. Now normally you would slide this in while pressing the pins up in the lock to be able to access this, then you have to find where the locking plate contacts the post and press, it will move out of the way without a lot of pressure.


This is with both A and B bypass tools in their proper position. Bypass B tool has to reach the second locking plate which is about 2 plates further down than the first locking plate. Once the A tool is inserted properly it moves the locking plate which also reduces the opening available to get the B tool into it's proper position.


                     Here's some more pictures of the locking mechanism and post.

Post, there is a 3 stamped in the the middle

Side View, when turned the sides contact the locking plates and press them against the springs

Top, furthest from where key is inserted into the lock.

Lock with Top Plate removed, this is the locking plate that the B tool interacts with
Lock with Top Plates removed, this is the plate the A tool interacts with

Here are the 4 plates that make up the locking mechanism for the shackle


So that's it. The mystery of how the Silver Bullet Bypass tool actually works is solved.

Monday, August 20, 2012

Hiding Files by Exploiting Spaces in Windows Paths

This is by no means a new thing. I've known about it for a really really long time, as I'm sure a whole lot of other people do, but for some reason no one uses it. Kind of like NTFS file streams, it's neat but not very many people make use of it.

There was a twitter post about something similar to this the other day and it took me by surprise that not everyone knew about it and that it was being treated as a novel approach.

Usually everyone talks about this for the exploitation of privilege, I use it to hide the true execution path to files. All of this requires that you have admin like permissions for it to work, this is pretty much worthless to the regular non priv. user.

So I thought I'd write up a post on it.

The basic premise is this: If you have a path with a space in it, Windows will break the path and attempt to execute all files with that path name as the file name.

Example: C:\Program Files\Crappy App\Whatever.exe

We will assume some program is attempting to start the application at the path above. IF the path is not enclosed in quotes (") it will attempt to run C:\Program.exe, C:\Program.bat, etc and then C:\Program Files\crappy.exe, C:\Program Files\crappy.bat, etc.. THEN if it fails to find any of those it finally launches the intended application.

OMG we just figured out how to super leet hack the world...

No not quite.

A lesser known bit of trivia... Windows will freak the hell out if you have a program named Program.exe in the C: directory. If you restart your computer and that file exists windows will alert you that it exists and instruct you to delete it or delete it automatically I don't remember for sure. This is because the good folks at MS know this is a problem, this is one of the reasons why you don't have file create permission on the C: drive but you do have folder create permission as a generic user. It is fun to make a Program.exe file that just echo's hello and put it in the C: drive and see what applications trigger it though. (I'm looking at you Notepad++)

Usually when there are spaces in the path those are all places you, as a regular non-priv user, don't have write permissions to. The only time I've seen where this was exploitable from a non privledged user was in some custom in house applications registry keys and some poorly written batch startup scripts with incorrect folder permissions. I've never viewed a service without quotes around the binpath, with spaces in the binpath, and that path is writable by non privileged users. Not saying it doesn't happen but it's fairly rare, from what I've seen.

But back on track, I'm talking about hiding files, or really just disguising where the files that are actually being executed really are.

You can use this technique to obfuscate locations in the registry, in services binpath, in batch files, all over the place.

I prefer to create services rather than registry run keys for nefarious programs that need to stay persistent. Lots of people check the registry occasionally, and nothing screams suspicious like a weird registry key in the run areas.

When was the last time you did a binpath= check and made sure all the paths were inclosed in quotes? When was the last time you checked all those and then compiled a list of the paths without quotes and with spaces then checked for like named executables in those paths?

The answer is never. 

So say we use this batch file to create a new service:

@echo off
sc create "Windows UDP Processor" binpath= "C:\program files\common files\run.exe" start= demand type= own
sc description "Windows UDP Processor" "Manages Windows UDP Routing Traffic"

*note: I always try to make things look as un-suspicious as possible hence the "sc description" command to add a description to the service. It's the little things kids.

Since we didn't use escaped quotes in the bin path we end up with a binpath of this:
C:\Program Files\Common Files\Run.exe
Instead of
"C:\Program Files\Common Files\Run.exe"

(we SHOULD have used this "\"C:\Program files\common files\run.exe"\" as the binpath)

I've already dumped my malicious file common.exe in C:\Program Files\.

When this service starts it will run C:\Program Files\common.exe not C:\Program Files\Common Files\Run.exe

IF the service ever gets examined most likely the person will check Run.exe, see that it's legit / harmless and move on missing the real file that is being executed.

Pretty sneaky right?

Well except for the part where you created a new service, that's still kinda sketchy.
But, if you find a legit service with spaces (more than one, usually in C:\Program Files) in the path you can modify the binpath of the service and remove the quotes (that it should have) and then place your file in the path with the proper name. Having your malicious file start the intended executable will belay suspicion.

There you have it, a legitimate service, pointing to a legitimate executable, but we're jumping in the middle and getting our file executed.

Then all you have to do is worry about AntiVirus programs going NOM NOM NOM on your files.

This works for Service BinPaths and Registry Keys, with batch files you have to go about it a little different.

With Batch files you can't have spaces in the path. End of the story.

So if you tried to call C:\Program Files\Crappy App\Whatever.exe without quotes, unless there's a C:\Programs.exe it's going to fail with a file not found.
So you have to use the short path name for everything up to where you want it to break and execute the file.
Like this:
C:\Progra~1\Crappy App\Whatever.exe
This would execute C:\Program Files\Crappy.exe

So there you have it, a different view. Using spaces to hide the true path of execution instead of using it to exploit a priv escalation.

Thursday, August 2, 2012

Saker Top Security Padlock Bypass

I've been struggling with this lock for quite some time now. I even took it to Defcon to the Lock Pick Village and had one of the Toool members take a crack at it and give me some advise on it. They couldn't open it either. They did give me some solid advise on attacking serrated and spool pins through a slow and meticulous approach.

This is 1 of 2 locks left standing out of the batch I picked up from Ebay a while back. The Abus diskus is the other lock I have yet to defeat. I've been working on both of them for quite a while now, I think the Abus will fall soon.

I'd taken the Saker apart in the past and noticed a bit of slop behind the cylinder between the release latch and the cylinder that I thought I might be able to use to make a bypass for this.

I was right.

I finally got around to it yesterday and made this:
Sorry rest of the world, I don't have a cm/mm ruler available at home.


It doesn't look like much and it will only last for about 5 openings tops I assume but it gets the job done.

I used a piece of spring steel from windshield wiper blades and a Dremel to grind it down, then some 100, 220, 320 sandpaper.
The narrow part is about 1/16 of an inch wide, small enough to turn in the keyway of the lock cylinder.

Here's how everything fits together.

You can remove the plate that keeps the lock cylinder in place by opening the lock and unscrewing this screw at the bottom of the shackle hole.

Screw at the bottom of shackle hole

Bottom of lock with plate to hold cylinder in.

Plate removed
 This is the cylinder, notice the protruding portion. When the pins are aligned properly at the sheer this turns which then kicks over a release latch (see below)
This part here turns...

This part here. This is in the closed position. The shackle is fully inserted in this picture

This is in the open position and releases the balls holding the shackle in place


The bypass tool can go all the way through the cylinder, fit in between the extended portion of the cylinder and the release latch.
Inserted and turned to actuate the release.

Just enough room.

Here's some pictures of the cylinder and the bypass tool.


     And here's the finished result. Insert bypass, twist with a pair of pliers, and viola...


Now, I've been told that this is a knockoff of an American brand lock (5000 perhaps?). Which I'm sure is probably true, I haven't had the opportunity to see one and I have no idea if this same bypass would work on it.

I still won't be satisfied until I can open it with real picks, but it's always nice to have an ace in your pocket.