Showing posts with label Master Lock. Show all posts

Tuesday, August 21, 2012

Master Lock #3 Padlock teardown and the Peterson Silver Bullet Bypass

I don't own many bypass tools. To be exact I own two, one of my own making and the Peterson Silver Bullet for Master Lock Padlocks.
I picked up the Silver Bullet at Defcon from the Merch area, it looked deceptively simple from the example lock and demonstration. I just so happened to have a #3 padlock I had brought with me so I bought it.

I spent the next several days trying to figure out how in the hell to use the damned things. I read the directions a few hundred times, I looked online and all I saw was a lot of videos showing how easy it was and descriptions of "you just slide this one in, press down, then slide the other one in and press down".

I could not get it to work.

Furthermore there was nothing online that showed exactly how it worked, what it moved, and what the lock looks like inside.

So I decided to tear my lock apart and take a look for myself and see exactly what the hell I was supposed to be doing in there.
It's a #3 it got a bit ground off
So these here are the bypass tools, one marked A (shorter) and one marked B (longer). I've added a bit of heat shrink as a make shift grip because these are very thin and are hard to hold onto if your fingers are sweaty, also after a few hours of trying to get these to open the lock my fingers were getting sore from the edges of the metal.
Peterson Silver Bullet Bypass w/ "custom" grips


Here's the lock with the face and the unimportant plates removed.


This is what the "unimportant" plates look like. The inside shape is identical on all of them. The ones near the bottom (where you insert the key) of the lock are smaller on the outside to accommodate the blue plastic "Master" wrap the locks have on them.

This is the lock cylinder. Nothing fancy, just a 4 pin setup with no security pins. The back has a protrusion that when the sheer point is reached and the plug turned interacts with a post that moves the locking plates and releases the shackle.


This is the padlock without the plug. Finally I was able to see what was going on in there.
Outlined in Yellow are the locking plates, Red is the post that rotates to move the plates and release the shackle
                                     Here's a larger picture of the internals of the padlock.

                                               This is what the locking plates look like

You can see the scratches where I've been using the bypass on this one.

                                               So this is how the bypass actually works
This is with the A bypass inserted. Now normally you would slide this in while pressing the pins up in the lock to be able to access this, then you have to find where the locking plate contacts the post and press, it will move out of the way without a lot of pressure.


This is with both A and B bypass tools in their proper position. Bypass B tool has to reach the second locking plate which is about 2 plates further down than the first locking plate. Once the A tool is inserted properly it moves the locking plate which also reduces the opening available to get the B tool into it's proper position.


                     Here's some more pictures of the locking mechanism and post.

Post, there is a 3 stamped in the the middle

Side View, when turned the sides contact the locking plates and press them against the springs

Top, furthest from where key is inserted into the lock.

Lock with Top Plate removed, this is the locking plate that the B tool interacts with
Lock with Top Plates removed, this is the plate the A tool interacts with

Here are the 4 plates that make up the locking mechanism for the shackle


So that's it. The mystery of how the Silver Bullet Bypass tool actually works is solved.

Thursday, June 21, 2012

Master Lock Warded Padlock Teardown


This is the Master Lock Warded padlock. Not a particularly impressive lock, but I've never taken one apart before. So I took one apart.
I removed the heads off the bottom posts that hold all the metal plates together.
All I had was a hand file. It took a while, but I finally got the bottom plate off.


Here we have the bottom plate (what's left of it) the key way circle and the shackle spring.  The key way circle sits loose trapped between the bottom and second plates of the lock.


Here we have the lock, from the bottom, with the bottom plate off. The spring goes into a hollowed out portion on the shackle and is what makes it pop up when the locking mechanisms are released by the key.


 After getting the bottom plate off, the rest came off relatively easily. They didn't exactly just all fall off like I had hoped, but I managed to get them off with just a small chisel to separate the plate then a flat head screw driver to move them up and off the posts.
Here's a picture of the lock half disassembled.

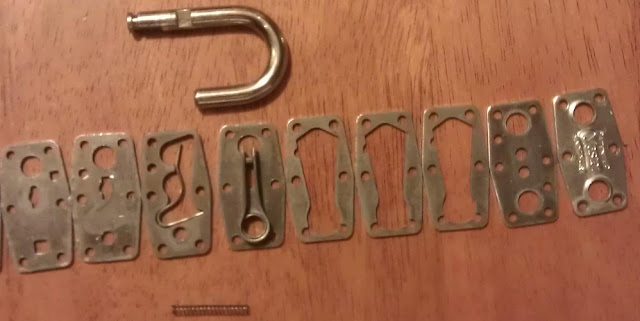
       Here's the plates that have been removed bottom on the left moving up to the right.


The second to last plate latches into a groove on the bottom of the shackle and prevents it from falling out when opened. Notice the groove on the shackle below. This is also the longer side of the shackle that is drilled out to accept the spring.

Next we come to the lower release for the shackle. This is part of two individual locking mechanisms.
The wire sits in a groove on the shackle.

                            When the key is inserted and turned it moves the wire out of the way.


                             The middle groove on the shackle is where the locking wire sits.

                                      
                                                   Here is just the plate with the wire.


Next is the upper locking mechanism. It also is a spring like release. When the key is inserted and turned it pushes the two sides apart removing it from the upper grooves on the shackle. (see previous shackle picture, the top groove is where this sits. It is a double sided groove.)


This is a series of pictures of the plates from top to bottom as you take the lock apart, some identical plates in series were not photographed as they added no value to the content.


                                 Here is the full lock disassembled bottom at the left top at the right.
                                            
                                                       The bottom half of the lock plates:
                                                 
                                                          The top half of the lock plates: